Table Of Content
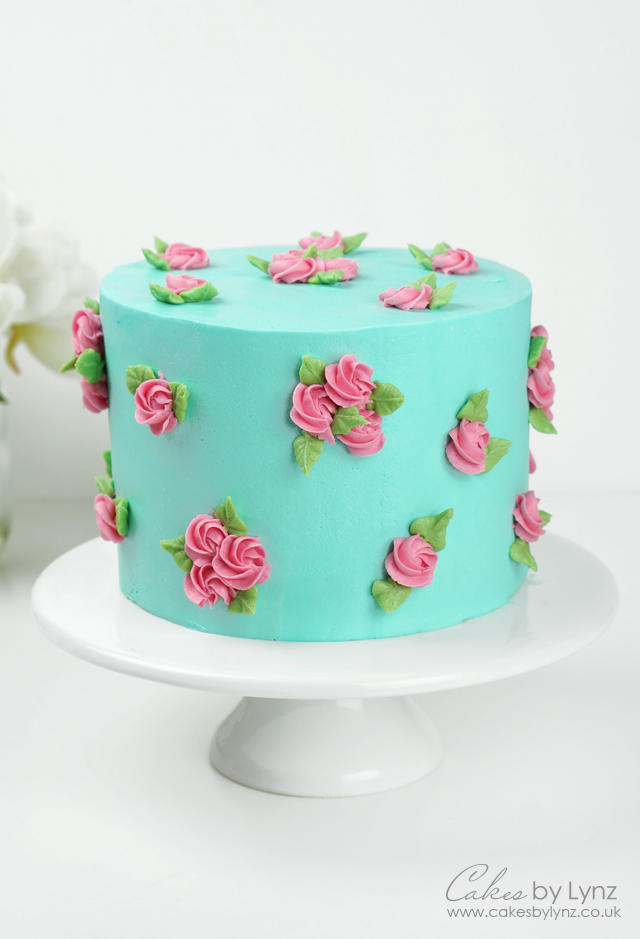
I often have extra bits of buttercream left from frosting cakes, which I just freeze to practice with later. There are thousands of tutorials online for piping different types of flowers, and I tried a few from this Wilton tutorial. Some of my flowers looked awful at first, but I just scraped up the ugly ones back into the piping bag and tried again until I got the hang of it. The ones I ended up liking the best were the traditional roses and the ranunculus. On today’s cake, I also experimented with a peony, and I love how it turned out.
22 Seasonal Wedding Cake Ideas for a Winter Wedding - Brides
22 Seasonal Wedding Cake Ideas for a Winter Wedding.
Posted: Tue, 23 Nov 2021 08:00:00 GMT [source]
Strawberry Cupcakes
I recommend choosing 3-4 colors in addition to the plain (white) frosting used to frost the cake. Once your cakes cool completely to room temperature, it’s time to whip up your buttercream frosting. You’ll need enough to frost the cake and make the buttercream flowers, so I recommend making the frosting in two batches.
Did You Love This Recipe?
You simply trace or pipe your design onto acetate (or parchment), freeze until very firm, and then transfer to your cake. Whitney DePaoli is the blogger and cake creative behind Sugar & Sparrow. She believes cake-making should be accessible for everyone, and loves sharing her favorite recipes and tutorials that anyone can master.
Enjoy the Tutorials!
Place your baking sheet with all of your beautiful buttercream flowers into the refrigerator for about 20 minutes to let them firm up before assembling the buttercream flower wreath. The other key to making the terra cotta effect is to use two different shades. Once I got my main color mixed, I simply added a small amount of the terra cotta colored buttercream to some plain white vanilla buttercream. You don’t need a lot of this lighter shade, just enough to spread a bit around the outside of the cake.
The minimalist cake trend is here to stay. Get in line at this viral Koreatown bakery
Imagine that you’re piping small rainbows over the center bud as you go around. To reduce the risk of creating splatter, place a small square of parchment paper on the flower nailhead, and then make your blossom on it. Once complete, place your buttercream flowers in the freezer. When they’re frozen, you can easily transfer them from parchment to dessert without any mishaps. Typically, the frosting you would use is a “decorator’s buttercream;” this is a frosting that forms a hard crust.
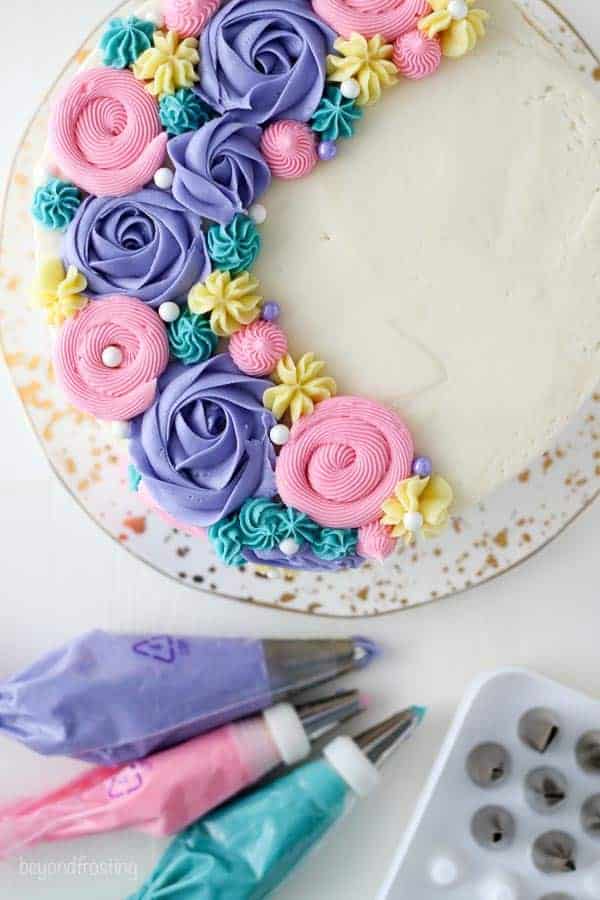
Apply a fresh coat of buttercream onto the dessert to act as an adhesive for the flower. Continue embellishing the crescent shape with buttercream flowers, utilizing tips of varying sizes. Employ the smallest tips to fill tiny gaps and gracefully taper off the half-moon contour at each end. To fashion these particular flowers, simply hold the piping bag with the tip pointing straight up above the cake’s surface. Squeeze the piping bag until the buttercream materializes into a flower, then release the pressure before gently lifting the bag away. Let’s talk for a minute about the cake design – the composition, grouping and flow of the sprinkles and piped flowers.

This will give each leaf a nice thick base and some weight to prevent the whole thing from lifting away. This is especially important if you use cookie crumbs rather than cake, as the buttercream won’t stick to the cookie as well. Take whatever you have left of the terra cotta colored buttercreams and put it in a piping bad, no tip needed. These techniques couldn't be simpler but can be every bit as elegant as a traditional frosted cake. This sweet buttercream tulip cake is so cheerful and perfect for springtime, or for the flower lovers in your life. Any of these techniques can be achieved with your favorite medium-consistency buttercream frosting.
Tips for Frozen Buttercream Transfers
When you’ve created a circle of outer petals, pipe a second row of petals with the same motion, only point the piping tip at a 45 degree angle so the inner row of petals stands up. Then, use your yellow buttercream to fill in the center of the petals with dots. Hold Tip 104 at a 45 degree angle, with the larger end of the piping tip touching the flower nail and the skinny end pointed toward the center of the flower nail. Pipe a swirl of buttercream as the base for your center bud as you twirl the flower nail 360 degrees. Then, create overlapping layers of buttercream as you rotate the flower nail.
This cake has light, fluffy layers filled with creamy vanilla buttercream, decked out with sweet and colorful frosting blooms. You’ll actually use the same method as you would placing the floral buttercream flowers on top of the cake when decorating. While cake mixes have certainly come a long way, the ingredient lists are always kept short and simple, perhaps to a fault, in order to make it as easy as possible on those who are using it. However, you won’t ever quite achieve the same richness of flavor and crumby, fluffy texture as with a homemade batter.
After the refrigeration process, they should be firm to the touch and really easy to handle. Although you might be tempted to place them in the freezer to speed this part up, I have not had good luck with the freezer. I know some bakers swear by it, but in my experience, the refrigerator is better when it comes to these delicate buttercream flowers. To make the buttercream ranunculus, fit a piping bag with Wilton Tip 104 and fill it with the peach buttercream (or color of your choice for the center of the flower). Prepare the flower nail by placing a dot of buttercream on top, then pressing a parchment paper square onto it. For the bags fitted with smaller piping tips, consider using couplers.
The bakery walls were painted three times to get the color exactly right. Consult our beautiful American Birthday Cake archive, here. Overall, this is a reliable place to order birthday cake for a crowd. They offer local pickup between 10 AM and 2 PM Monday, or Tuesday + Wednesday from 10 AM to Noon. Check the cake page of their shop for the latest menu of options. If you’re looking for an amazing birthday cake in Los Angeles, you’ve come to the right place.
When piping buttercream flowers, hold the piping bag firmly in your dominant hand while exerting a gentle squeeze. Use your other hand to guide the tip and shape your blossoms. Sometimes you just want to make a pretty cake, but you just don’t feel like piping a ton of buttercream flowers or doing anything super fancy. For this video, we are decorating 8 inch and 6 inch stacked tiers, frosted in our fluffy vanilla buttercream frosting. Each tier is on its own cake cardboard cut down to size, and the top tier is supported from beneath by 4 bubble tea straws (cut to the height of the bottom tier).
If you have prepared and chilled flowers, you can easily add them to the side using the same technique as the top (as listed above). Make sure your hands are clean and dry, and work quickly to make sure the flower doesn't melt on your fingertips. Should the buttercream be too stiff for piping, try massaging the frosting inside the piping bag to achieve a more pliable consistency. Ensure that the piping bag hovers over the cake, granting the buttercream sufficient space to flourish. If it comes into contact with the cake’s surface, the buttercream will have no room to expand.
I used maybe ½-3/4 cup for each of the colors I used most. You can spot correct as needed by gliding the hot spatula over the chilled buttercream to smooth. Acquire an assortment of petal tips and a piping nail for your work surface. If you wish to purchase individual tips online, here are some of my personal favorites for creating stunning floral designs. When you look at the cake from various angles, do you see the way the your eyes travel along the scattering of sprinkles that slant in a diagonal along the front of the cake?
This Easy Buttercream Flower Cake comes together so quickly. Such a pretty way to welcome spring and much easier than piping roses. With the larger end of Tip 104 touching the flower nail and the skinny end pointed upwards, pipe the center bud as you twirl the flower nail 360 degrees. Pipe petals around the bud as you rotate the flower nail – shorter petals in the beginning and longer petals as you reach the edge of the flower nail. Since 1929, the Wilton Team of bakers has been inspiring the joy of creativity in everyone, everywhere, every day. No matter where you are on your baking journey, Wilton is here to help you bake your world happy.


No comments:
Post a Comment